NinGenius Online Teacher Overview |
NinGenius Online Student Tutorial |
Click HERE for Teacher Resources
How to Get Started: NinGenius Online Tutorial
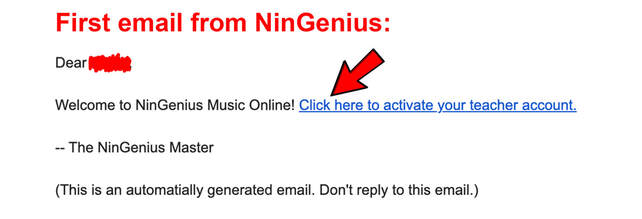
1) After your purchase of a NinGenius Online subscription from stepwisepublications.com, you will receive an email within 24 hours containing a link to your new Teacher Account. The email is sent from [email protected]. You may need to check your Spam folder and/or adjust your spam filter settings to get these important emails. Click on the link as shown below.
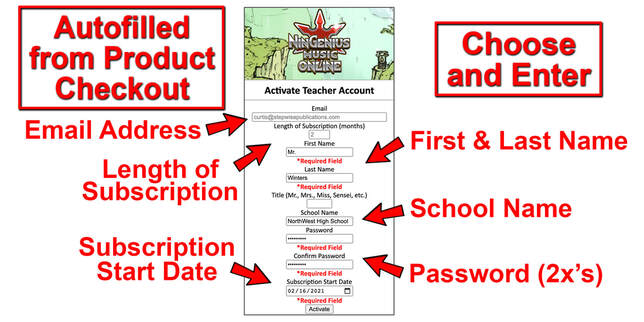
2) The link will bring up a series of fields associated with your teacher account. Some of them will already be auto-filled, based on information you provided when purchasing the subscription, including your email address, the length of the subscription, and the start date of your subscription. Fields you will need to fill in include your first and last name, your school name, and a new password of your choosing (entered 2 times). After you have provided all the necessary information, click "Activate".
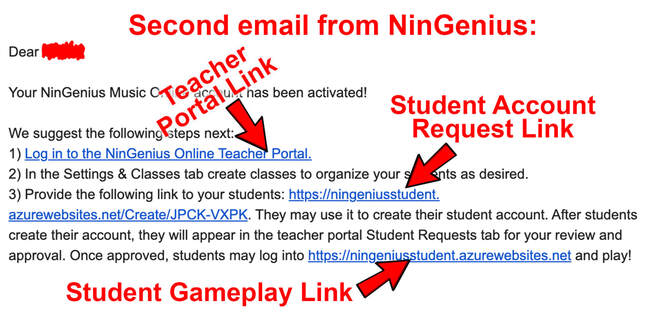
3) Within seconds you should receive a new, second email from [email protected] (check your spam folder if it does not appear in your inbox). Click on the first link to go to the Online Teacher Portal, where you will enter your classes, approve requests for student accounts, and see realtime student performance data.
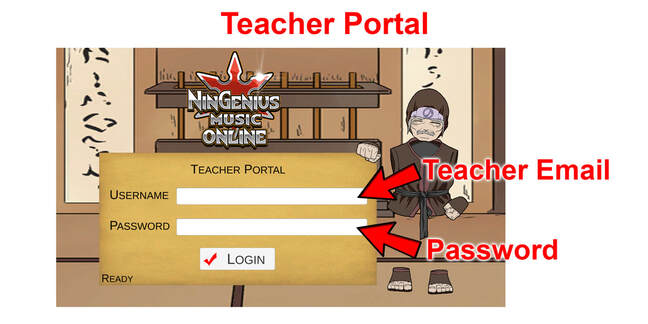
4) To access the Teacher Portal, enter the email address you used to purchase the subscription, along with the password you created. Click Login.
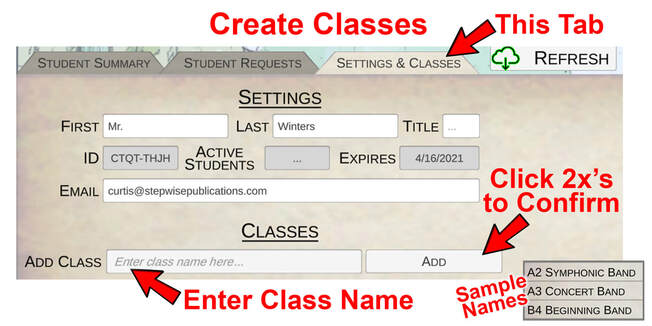
5) The first thing you should do with your new teacher account is create classes to represent the various classes or groups your students are in. You can create as many "classes" as you'd like, with the knowledge that you will eventually be able to sort students by name, grade, instrument, AND class. Most teachers should simply use the 6-8 classes that their students are grouped in according to their school schedules, such as Beginning Band, Concert Band, Percussion Class, etc. For each class, enter a name and click the ADD button twice (the second time to confirm the add).
6) Now you are ready to contact your students and send them information on how to create their student accounts. The second email you received from [email protected] (shown in Step 3) provides links and instructions for students. You can copy and paste them into a student email, or create your own invitation using the same links.
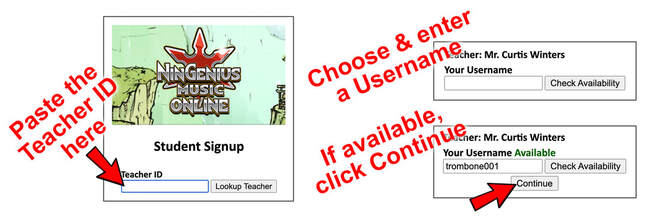
7) Students must go through several steps to create their NinGenius accounts. After clicking the first link you provide they are asked what your Teacher ID is. This is an 8-digit code that was assigned to your subscription and provided in the second email. They can copy and paste it, or enter it manually (don't forget the hyphen!). Next they must choose and enter a Username. Encourage them to choose a Username that they ALREADY USE for a student email or account. After checking availability of the username they click Continue.
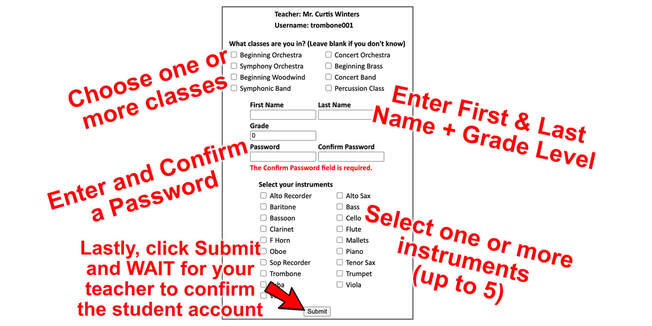
8) Next each student answers a series of important questions, including:
a. What classes are they in?
b. What is their First and Last name?
c. What grade are they in? (NinGenius will automatically progress every student each August)
d. What password do they want to use? (two fields to allow spelling confirmation)
e. What instrument(s) are they learning? (up to 5 can be selected, but these can be edited later)
After double-checking each answer, they click "Submit"
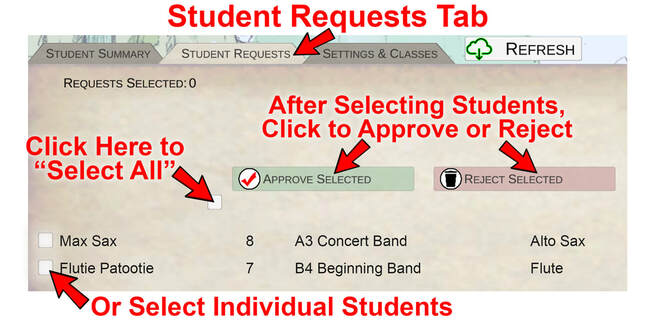
9) Once students have submitted account requests, log in to the Teacher Portal and click on the Student Requests tab in order to approve or reject each request. You can click the "Select All" box, or click individual student boxes to select them. Next click "Approve Selected" or "Reject Selected" TWICE to accept or delete student accounts. Class selections and instruments can be edited later.
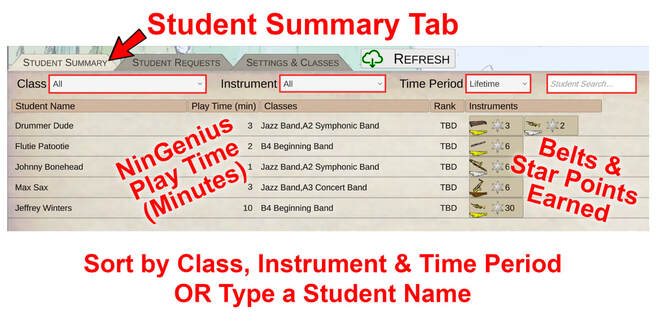
10) The Student Summary tab allows you to track the progress of each student. Data can be sorted by Class, Instrument, and Time Period, or you can search for particular students by Name. Data shown in this list includes Instrument, current Belt Color, and "Star Points" earned through playing and achieving greater speed within the 35 levels. Eventually you will be able to click on a student in order to see more detailed data and to edit their Name, Username, Password, Instrument(s), and Classes they belong to.
